Monday, October 15, 2012

KCWC...days 3-7

Does shopping for fabric count as an approved activity during KCWC?

Well that is how I spent day 3...shopping, really? Like I don’t have enough fabric already. Well little Miss N Needs MORE fall clothes and I figured while my wonderful mother was on fall break we would zip on over to our favorite little fabric store Sew Blessed. You have all heard me talk about them before, if you want to learn more about what they have to offer stop in for a visit.
www.sewblessedfabric.com

                                                                                                      Day 3


Heres my haul:

3 wonderful fall prints and 3 fall solids as well as 3 colors of rick-rack and 2 more OOP Oliver + S patterns

Well with day 3 a sewing wash I had to play catch-up.


I did managed to get Rose cut out on day 3 as I had not prepped that projects yet.


Day 4


Constructed CC Rose from some of the most wonderful coordinating yellow and gray print I have seen in quite a while. I don’t think I would have picked up a pre-made dress with this same color pallet for Miss N but having had the opportunity to make it for her…I believe it turned out smashingly. I even took the opportunity to match the large flower print running down the center back. Now all that is left for this project is the dreaded buttons and holes.


                                                                         Day 5


What a wonderful day…quick and easy CC Abbie pants with the very predictable added ruffle at the hem and a Christi top by Maja. I did not pleat the sleeves as I knew I was on a time crunch and was not going to smock them. I did fold out about 2 inches in the fullness of the sleeves as I did not want them to be so full that Miss N would get lost. The top went together very quick and easy and like so many other projects all I have left is the buttons and holes. I wish I enjoyed doing the buttons and holes.


       Day 6 & 7


CC Paulie in the most darling embroidered light pink corduroy with a package I appliquéd. Piped in lime green micro-check and a pink and white polka-dot ruffle. To coordinate with the package I appliquéd. The body fabric for this little number was ordered on-line from www.farmhousefabrics.com
the dots came from sew blessed and the micro check was from my stash.


The appliqué design was from embroidery boutique. Here’s the link if you would like one for your collection. http://www.embroidery-boutique.com/present-applique-precll82.html
 . I dearly love the look of this outfit and I am looking forward to lots of wear during the holiday season as well as winter birthday parties.


Wednesday, October 10, 2012

KCWC Day 2:

One sick baby,
One kid home on fall break,
One batch of peanut butter chocolate surprise cookies,
and a bunch of sewing.

With a sick Miss N nestled in on the most comfortable chair in the house with her “b” and bear, I took full advantage of the fact that she would not feel like playing wide open with mommy.


I set the ten year old up in the kitchen to make peanut butter cookies that he chose to wrap around chocolate chips…YUM YUM YUM.


Off the my sewing room I went!


Finished up the Oliver + S tops I started yesterday, put together a pair of green twill pants and even stitched out a holiday t-shirt for Miss. N


I am so surprised as to how much I can get done when everything is cut out, marked and in order…

Next on my list a yellow and gray dress using the Children’s corner Rose pattern…


FUN FUN FUN

Tuesday, October 9, 2012

KCWC day 1:


Today was very productive, started 2 garments and finished one.
The 1st was a super easy and fast Children’s corner Abbie pants with an added ruffle. the 2nd was an Oliver + S Picnic top!


                                                           Sewing went very wall, I was even lucky enough to have my mother sharing my sewing room with me.

Stay tuned for a guest post from my very experienced mother!


Lots more to do today…
Joy

Thursday, September 27, 2012

In preparation for KCWC...

In preparation for KCWC I have been setting the stage for success.
I have selected coordinating fabrics, traced and cut out patterns, gathered notions. I have even gone as far as to cut out and mark a few garments. I want too have the opportunity to make every moment of the up coming challenge count.

The plan:
3 pairs of “ruffle hem” pants. A green twill pair, a blue cord pair, and a tone on tone orange herringbone pair. I will be using CC Abby as they go together quick and easy, all 3 pair should take me no more than 2 days. (2hrs) These will be just like the gray pair on my blog minus the ruffles on the butt.

2 Classic Picnic tops by Oliver + S. one in a multi-colored dot print and the other in a cute brown print with pink and green trees. I am planning 1 day for each top (2hrs)

1 top, I am going to use the Christi pattern by Maja’s heirloom. I will use a black background fabric with small blue, teal and light blue flowers. I am not going to pleat and smock the sleeves for lack of time. I am going to use this as more of a test of the pattern. If I like the look this pattern it is likely to be revisited. I think this top will go together rather quickly 1 day is what I am allowing (1hr) Not counting button and button holes.

1 dress, I am going to use CC Rose and some yellow and gray fabric I have had for a while. I have used this pattern before and it to goes together lickitty-split and should take no more than 1 day (1hr) Again not counting button and button holes

Something for the holidays will round out my busy week. I will be using CC Paulie pattern that I have used many times before…I know this will take more than one day as I plan to add some extra touches…the extra time should be well worth it…and who’s really counting anyway?

The result of the week should produce 3 outfits for play, one play dress, and a fun holiday something.
Not bad for 7 hours of FUN…
I don’t know if I will have the time to blog as I go but I will do my best, if nothing less I will take some pictures and post after the week is over!
The plan has been laid…LET THE SEWING BEGIN!

Tuesday, September 18, 2012

KCWC

Earlier this spring I was very excited to come across several ladies who were sewing kids clothes for one hour each day for 1 week. I knew once the challenge rolled around again I would be participating…so it is that time of year again and I am IN…I will be spending the next few weeks finishing up some projects and prepping for the week challenge. Who knows how much I will get done but I am hoping to have lots and lots of fun. Come join me…
Go give Elsie Marley a visit at http://www.elsiemarley.com/ and let her know that your in!

Sunday, September 9, 2012

Ruffle top socks tutorial...and Miss N plays with thread

So it all started with a LOVE for little girls in ruffle socks. There is nothing that says I AM LOVED more clearly than a big hair bow on the head and ruffle socks around the toes. If you feel the same than this little toot is for you.

As I am starting to get things together for fall a run to the local boutique was in order. I picked up a pack of ruffle top socks and paid a fortune (6.99) for 2 pair but I needed them right then as the ones from last season were sadly out grown.

After returning home and plundering through some stash goods I found just enough left over islet ruffle to try my hand at ruffle top socks. It was easer then I thought it would be…

The plain top socks were purchased on sale for less than a dollar a pair…what a deal! That’s more than 7 pair for the price of the boutique ones.
Now for the fun part, putting my ingenuity to work.


I removed the header from the top of the pre gathered islet. This left a ragged mess that needed to be trimmed. I could have used the expensive flat islet but as I was just learning I wanted to play it safe and use the inexpensive left over stuff.
I gave the islet a nice press and identified the right from the wrong side.
I measured up from the bottom edge of the islet enough to even out the raw edge. I then cut along this line.


I measured the wide stretched opening of the sock and doubled this amount to determine the needed length of islet

 
Then I turned under only about 1/8 of an inch along the cut edge and along both ends.


With a few pins I marked the center of the islet and the right and left on the sock . I did this because I want the seam on the inside of the ankle.


Then I set my machine to a wide long zigzag…(6,3)


I pinned the islet with ends overlapping just a bit (1/8 of an inch)
With needle down I pulled the sock as tight as I could so the islet would lay flat Wrong side of islet to right side of the sock.


I made sure the center mark on the islet matched up with the outside ankle mark.
Once I finished stitching around the top of the sock I did a quick zigzag along the overlap at the inside of the ankle.

And the finished product was cuter than anything I have ever bought at a boutique for only about $1.00 per pair.

Just think of the possibilities, use those little bits of lace from heirloom sewing projects, talking about fancy socks. Try dieing the lace to match different outfits, maybe some beadding with a piece of ribbon woven through it might look cute? Hope you have a blast showing the ones in your life that they are loved, from the top of their head to their little toes!


And while I worked Miss N had fun playing with my not so often used spools of thread. I secured all the thread tails as to avoid a really big mess and put them into a basket. Miss N enjoyed dumping them in a rainbow of color and putting them on the pegs of the thread storage box! What simple Sunday fun!

Thursday, August 30, 2012

Making something funky

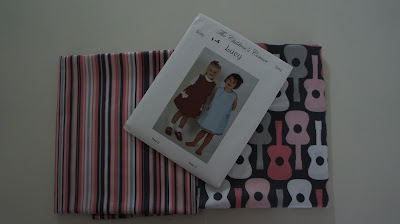
Making something funky, Today I am going to work through the process of making something funky. I have changed my mind regarding the pink and gray stripe material and guitars. My new plan is to use the same fabric but cut the stripes on the bias to form my own chevrons.  I will be using CC Lucy pattern that I will shorten to tunic length as I plan for Miss N to wear this top with her gray ruffle butt pants I made just the other day!


Pictures and note to follow:
The first thing I did was trace my pattern off onto a reusable material I use the cheep sew in interfacing. I buy yard and yards of it when it is on sale, most often I never pay more than about fifty cents per yard.


Then I placed the center front at a 45 degree angle to the stripes, and cut. Turned my pattern piece over, lined up my stripes at a 45 degree angle and cut. I repeated the same process for the back. I then secured the 2 front pieces with some spray glue and stitched at ¼ of an inch. I repeated with the back.
Pressed the seam to one side.
I then marked where I wanted my appliqué. And appliquéd a way! I NEVER appliqué before cutting out the fabric but in this case I had to as I needed to “make” my own fabric.
I thought I wanted 2 guitars…but after seeing just one I think 2 would be to much.
I think this is going to be a cute and fun outfit for Miss N